Saturday, December 19, 2009

crafty christmas gifting

am i the only one in a crafting frenzy?? i don't think anyone has mentioned that we have been crafting weekly. due to the holidays and our never ending lists of ideas, anyone who can has been getting together every monday. we rarely do the same craft as we all have different gifts to make and decorations to create. some of us are night owls and we tend to get into a groove around 11 pm. let me just say that crafting until the wee hours definitely makes for crafting hangover the next day. 

i have been guiding some along in sewing (not that i know enough to do so), so you may see more sewing ideas in the next few months.

i just posted a few tutorials on my own blog, but since i haven't posted on here in a very long time, i thought i would share. unfortunately, i don't know how to get the posts to this blog, so i will share the finished project and the link and you can read more there.


i whipped both of them up on the same day with a little kiddie patrol help from my parents, so they are definitely doable in the next few days if you need a quick, hand crafted gift. only 5 crafting days left til christmas!

Wednesday, December 9, 2009

Christmas Craftiness: Wooden Countdown


I've seen these countdown-type things all over the blog world. We have one where the numbers are on hooks, and it is a pain to change out the days. This one is something I can do when I walk by it, so it is much easier. I can rarely say that I had everything I needed to start and complete a craft project at my house (without having to buy anything), but this time I actually did.

I used a Martha pack of paper for all of the paper parts. The blocks are 4 x 4s left over from several other projects on here, and the base is a 2 x 6 left over from my JOY plaques. I used my cricut to cut everything out: squares and numbers - George and Basic Shapes, Christmas - Mini Monograms. I painted everything and then used mod podge to glue and seal. I haven't distressed these yet, but I want to. I'm always scared because there is no going back once you start distressing. Maybe I'll do it next year if I get tired of the way they look then.

Tuesday, December 8, 2009

Christmas Craftiness: Wooden Plaques


I have been kind of obsessed with this blog lately. The Shanty Sisters are crafty AND creative. I want to make so many of the things they create. I loved these JOY plaques that they made, so I copied them and tweaked mine a little. I have a friend that decorates with "grinch" green and red. I love those colors every year, so I decided to use that color scheme. The Shanty Sisters give a great tutorial, so follow theirs if you want to recreate.


Up close - I am still trying to figure out how they distress theirs. Maybe they have stronger arms than me, but I sanded and sanded until I thought my arm might fall off!


On my buffet - I took these pictures while I was still in the process of decorating, so it's not quite finished in this picture.

Christmas Craftiness: Applique Shirts


ornament shirt


Christmas tree shirt

a little cutie wearing her Christmas tree shirt


Sunday, October 25, 2009

more blocks


BOO!


EEK!!

BOO!! again

I cut my squares with a paper trimmer and used the Cricut cartridge Simply Sweet to cut the letters.


Friday, October 23, 2009

believe blocks

Back in June Beth made these cute blocks for Father's Day. This week at craft night we decided to make them for Halloween and Christmas. These blocks were super simple and are a great present! Think initials, sport's teams, or quotes (short of course).


Here are the supplies you will need (I'm horrible at tutorials so let me know if I've forgot something girls!):
  • 3.5x3.5 wooden blocks (these are made from 4x4 posts which are in actual size 3.5x3.5)
  • 3x3 paper squares (I just cut mine with a paper trimmer). You will need 6 per block.
  • Mod Podge
  • embellishments (You can either make these with the Cricut or use pre-made ones)
  • letters (these can be made with the Cricut also or stamps or chipboard). I used chipboard cutouts and painted them with glitter paint. I think it is going to become a new obsession.
  • paint
  • distressing ink or paint

Sand your blocks down and brush off. Apply paint to the corners (basically where your paper squares will not cover). Mod Podge your paper squares on to your blocks. To seal paper put another coat of Mod Podge on. Then simply decorate with embellishments and words/phrases/letters. You want to let these dry for a few days. I roughed mine up with distressing ink and sanded them down really good.

Friday, October 9, 2009

a is for applique addict


Are y'all getting the drift that we are all addicted to all things appliqued?

Thursday, September 24, 2009

More Appliques

So I am NOT good at the tutorial thing, so I will follow Beth and just post pictures of the final products! Ignore the poor quality of my pictures taken late at night with HORRIBLE lighting! :)


The turkey eyes are buttons, and the gobbler is a hot pink bead.


(I added this ruffle to make this boy shirt look a little less boyish.)


So I am NOT good at the tutorial thing, so I will follow Beth and just post pictures of the final products!

Friday, September 18, 2009

Applique Fun

Maribeth enlightened us on the appliqueing process. Now we can make cute, inexpensive shirts to match our childrens' clothing. Yay! Here are some of the shirts that I have made. All of these were cut with the Cricut. I cut like a 5 year old, so cutting by hand is not an option for me.


Thanks for taking the time to type out the tutorial, Jen:)

Wednesday, September 16, 2009

cricut made applique


During the month of August, we got together several times to applique some t-shirts. Hopefully, some of the other gals will post their cute projects too (hint, hint).

To make this one, I used:
cricut cutting machine
doodlecharms cartridge
three 4 x 6 pieces of fabric
heat and bond fusible webbing
an iron
scissors
embroidery thread and needle
patience.

To cut the applique, I practiced the size and layout of the design by cutting it on to scrapbook paper first. I HIGHLY recommend doing that. There's nothing worse than wasting your pretty fabric. Well, maybe famine or pestilence. But wasting fabric is definitely right after that.

Anyhooo - After I found the size and placement that I liked best, I took my fabric square and backed it with Heat N Bond.

FYI: To back your fabric, follow the directions on the back of the Heat N Bond package. Or just have Maribeth do it for you. Like I did.

After Maribeth prepped the fabric for me, I placed it on the Cricut cutting mat and chose my design.
I cut the design three times on three different pieces of fabric so that I could layer the fabric.

I removed the paper backing from the newly cut design and carefully ironed one piece at a time to my t-shirt.

Next, I chose my embroidery floss colors and began stitching.
I used a running stitch to outline the ice cream and a chain stitch to add some interest to the cone.

Check out these embroidery stitch videos for more info. They helped me a lot.

If my tutorial is super confusing to you (which is highly likely), keep in mind that there are ten million tutorials for making appliques out in bloggy land. I like this one at Sew Mama Sew.

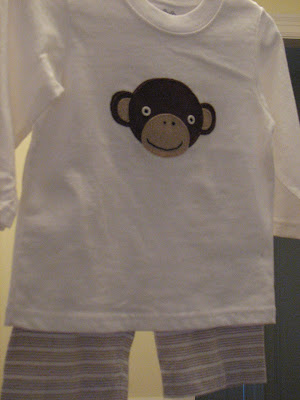
I loved appliqueing so much that I decided to get brave and make a monkey as well. I didn't use the Cricut for this one - I just traced it onto the paper part of the Heat N Bond and cut it out with nice, sharp scissors.

Tuesday, June 16, 2009

Father's Day Idea

I copied this idea...

http://www.alphamom.com/holiday/2009/05/handamde_mothers_day_photo_cube.php

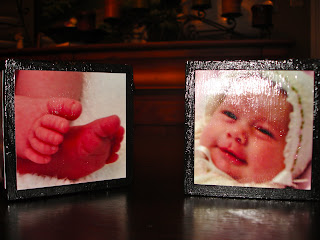
...and made these photo cubes for my dad and father-in-law for Father's Day.

I chose to paint mine black.

I like my modge podge shiny so I always put on several thick coats. That is why the flash looks funny in this picture.

One tip: the tutorial says to use a 4x4. I went to Home Depot and asked the guy there to cut two pieces of 4x4. He told me that a 4x4 is actually not 4 inches, it is a little over 3 1/2. So if you make it, tell the wood cutting person at Home Depot that you want a perfect cube.

This was super cheap. You have to buy the whole 4x4, but it was only $5.96 (now I have like 6 feet of 4x4 for some other random project I have yet to come up with). Definitely a recession-proof Father's Day gift.

Thursday, June 11, 2009

Closet Organizers

Ten weeks after having Meyers, I am finally feeling crafty. A baby sleeping through the night can do wonders for you! This is hardly crafty at all, but I was feeling left out since I haven't posted. So here are my closet dividers.

I wanted to organize Meyers closet since I have been buying her a lot of dresses lately (thank you Jennifer T). Some of them are way too big, but I still want them in her closet. I made 3, 6, 9, and 12 month dividers. I haven't gotten around to the bigger sizes yet.

No tutorial because this is so easy my ten week old could do it! I just used cardstock, scrapbook paper, and number stickers. I also used a hole-punching tool. You really need a long punch with a 1/4 of an inch hole. The Martha one that I used did not have a big enough hole. That is why only the 3 month one is punched. After all your paper is punched and stuck together, punch a hole and cut a slit. I had to play around with this some to make sure it fit between the wires on my shelves.


And they could be much cuter. I kind of got in a hurry. I may change them later.


Friday, May 29, 2009

simple therapeutic neck wrap

okay, so it's been an eon since any of us posted on here! i'm planning a little tutorial of the lampshade skirt i helped jennifer with (and maybe a drawstring skirt too, i promise the construction is the same!) but until then, here's a little something to make the blog less...quiet. it could also be a little test to see if anyone out there is still paying attention to it! ;)

we haven't posted any sewing stuff here, but a few of us do sew, so i thought it was still appropriate. for me, most of my sewing comes in the form of sweet little clothes for my monster girl, which makes sense since i took up sewing to make things for her after seeing how much i could spend on pretty clothes! but i have recently completed a few projects that aren't clothing, and since they were super easy (just a bunch of straight seams, can't beat that!), i thought i'd post one of them here.

seriously, if you have access to a sewing machine and you can drive a straight line, you can make these. and people will think you're so fancy!

so here we go, therapeutic neck wraps. i made these for preschool teacher gifts, since over the course of the year, faith had four teachers (she had three at the start of the year, then one had a baby so she got a new one!) i came across a tutorial for a spa set, changed it up a little bit, and filled them with a combination of rice and flaxseed for good cold and heat therapy uses.

promise, super easy, i managed to get them all finished over the course of a nap with time to spare! the fiddleiest part was the encased seam edges, they were pretty thick at the corners which was a little difficult to navigate, but not too bad.

bear with me, i've never written a tutorial before! :)

materials:
piece of quilting cotton fabric, 12" x 22" (this is the length of a fat quarter, which you can get inexpensively at fabric stores, joann's often has them on sale for $.99)
thread
flaxseed and rice for filler (you can use one or the other, a combination, or another filler like buckwheat or feed corn)
essential oil (optional)


step 1:
fold fabric lengthwise, wrong sides together and press

step 2:
stitch around the edge of the long side and one short side, using a 1/4 in. seam allowance


step 3:
fold edge over at stitch line, press, fold over again, and press. stitch along the folded seam, close to the inner edge. this makes an encased seam that helps keep all of the filling inside where it belongs!


step 4:
fold tube in half (taking the other end seam allowance into consideration), press, then fold each half in half again, pressing again. this provides guidelines for sewing the compartments that help keep the filling evenly distributed.


step 5:
fill 'er up! use approximately 1/2-1 c. of filler material per section (depending on how full you want it--just be sure to leave room to stitch the closing seam.), whatever you decide to use. you can also add a drop or so of essential oil to the filler for additional therapeutic qualities, if you like that sort of thing. most often people use lavender or peppermint, but since i didn't know if any of the teachers had allergies or sensitivities to fragrance, i left it out.


step 6:
making sure the filler is out of the way of the pressed guideline, stitch across the body of the tube, making sure to backstitch at each end. it's important to keep the filler out from under the stitch line, otherwise your needle will break. don't ask how i know that! :)


step 7:
repeat two more times, creating an encased seam at the end like we did for the first to seams.


and that's it! you're done. you can use these for hot or cold therapy, just pop them in the microwave for a minute or so for an hour of heat or store them in the fridge to ease bumps, sprains, headaches, etc.


you can obviously make these in other shapes and sizes as well, i made a smaller one in fancy dora the explorer fabric to keep in a freezer bag in the freezer for when my monster girl runs into/falls off of/trips over something! and while the teacher gift ones were divided up into the 4 squares, the one i made for the tute had the longer middle section (i plan to use mine for migraines), but it's just a matter of preference!

hope that all made sense, and any feedback would be greatly appreciated! :)