Tuesday, April 7, 2009

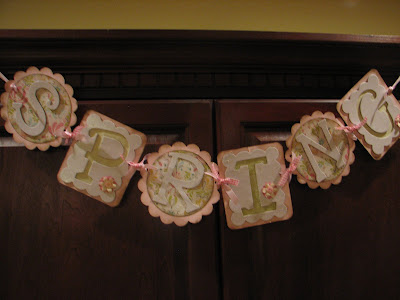
maribeth's spring banner

materials:
making memories garden party paper pack 6x6
cricut & accents cartridge
sewing machine
white cardstock
making memories paper flowers
pearl stickers
making memories ribbon
corsage pin
white crepe paper
autumn leaves buttons
small clothes pins
white twine
tim holtz distress ink in walnut stain
dauber
sand paper
green thread
mod podge
foam brush
glue dots
what to do:
1. cut letters and flower shape using cricut. this step could be completed with any shape and could be handcut. the letters can be purchased as well.
2. using distress ink and dauber, antique letters and shapes to your liking.
3. adhere letters to flower shape using glue dots.
4. embellish:
s:3 paper flowers & pearl stickers, p: ribbon & corsage pin, r: create crepe paper rosette and accent with layered buttons, i: paper flower & button
5. create butterfly: trace butterfly template onto paper twice. trace again in smaller size. using mod podge and brush, glue pieces together creating two butterflies (one large & one small). using sewing machine, stitch two pieces together down the center leaving threads longer to create antennae. distress with ink and sand to liking.
when working on this banner, the papers reminded me of vintage aprons so i decided to clothes pin the flowers to white twine to create a laundry line effect. i hung it in my dining room window, hence the night time picture so you can see the details. please ignore the sticky little finger prints. i just love how spring-y it turned out!

maribeth's bunny garland

jennifer's bunny garland inspired me to make a similar one. i drew this bunny last year to create an applique for my children to wear during easter. on the applique, i used a chenille dot from a vintage comforter. for the garland, i used a variety of embellishments-
1. making memories brad 2. prima paper flower and pearl sticker 3. handmade pompom from embroidery thread 4. autumn leaves button and making memories tulle flower (cut into circle) 5. prima paper flower and pearl sticker

if i were a good crafter, i would have taken pictures before and after, as well as created a tutorial for the pompom, but i just didn't think ahead. i will create a tutorial in the future, i promise. until then, let me know if you have any questions!

maribeth's easter eggs

here is my version of the craft:

i used the exact same materials and steps as jennifer did here. the main difference was that my eggs are smaller. i purchased a package in the easter section of hobby lobby. the kraft colored eggs are just the original paper mache with white polka dots added. then, (of course,) i distressed and sanded them. because my eggs were smaller, when i decoupaged the one egg, i cute my paper in 1/4" strips. 

for display, i used some reindeer moss and jennifer "zshushed" them for me. "zshushed" means to fluff or pretty up for display purposes. i hope i spelled it correctly!

Monday, April 6, 2009

Sonya's Decoupaged Photo Frame


I have had this family photo for two years and have never found a frame that I really liked (or could afford), so I decided to make my own! Jennifer did this several months back, so I took her lead and here is my results.

The How-To!

Supplies:

8x10 (size is up to you) unfinished wood frame with glass included (Michael's -$3.00 with 50% off coupon)
Modge Podge (I used satin finish, but whatever you like is good.)
Modge Podge sponge
2 sheets 12x12 decorative paper (Actually, you only really need one, but if it has designs that you want to match up and run the same direction you will need two.)
Acrylic paint of your choice color & paint brush (I used DecoArt Americana's Bittersweet Chocolate.)
Ribbon and/or any embellishments you choose
Craft glue or hot glue gun
Fine sandpaper
Distress Ink


1. Remove glass and backing from frame and sand down the entire frame until smooth.


2. Paint frame front and back (if desired) and allow to dry completely.


3. Measure area on the frame that you want to cover and cut paper into 4 strips. Remember that you will have to be careful how you cut the paper to be sure that your paper's patterns are running the same direction. If you are really smart, you can measure and cut the paper into right angles. I failed geometry and I am way too lazy to figure that out so I did it the easy way, which in my opinion, is the best way. :)


4. Spread Modge Podge on back of paper and on the frame and place horizontal strips first. Apply vertical strips next. (I made mine overlap the horizontal strips.) Because this is my first Modge Podge experience, I learned it may take quite a bit of Modge Podge and lots of pushing and pressing down as bubbles tend to be a common problem. They eventually do come out so be prepared to work with it some. Cover entire frame liberally with Modge Podge and let dry.


5. After drying and if you like the distressed and vintage look like we do, go nuts sanding the frame with a fine sandpaper and apply a little Distressing Ink in the corners and edges.


6. I lined my ribbon up on the seams where the papers came together and used craft glue, wrapping the ribbon to around to the back. You could also use a glue gun, but I felt like I had a little more control with the craft glue. I didn't want to see any glue coming out from under the ribbon.


7. Add a bow or buttons, whatever you like, and put glass back in frame.


8. See? Easy Peasy! And believe me, if I can do it ANYONE can! The whole thing cost me $4.50. I love the way it turned out!

Saturday, April 4, 2009

kris's spring banner


okay, jennifer posted all the nitty gritty details about how to make her spring banner, but i just wanted to post proof positive that even newbies can do this! i've never been one for paper crafting, it tends to baffle me (fabric is more my medium of comfort), but nonetheless, here is my spring banner in all it's glory!

this is also a fun way to see how unique the banners are, depending on what paper and accents you choose, since the letters are the exact same as the ones jennifer used, and yet our final banners are very different. :)

Friday, April 3, 2009

Jennifer's Spring Banner

Arghh... I need a new camera...
This tutorial was originally posted on: nannygoat blog. This is just my take on it.

Supplies:
2 pieces plain colored cardstock
2 pieces scrapbook paper
2 pieces coordinating scrapbook paper
glue (I prefer Martha Stewart's Gel Adhesive)
glue dots
2 kinds of ribbon
Chipboard letters (I found my kit at Archivers in the Hot Spots section for CHEAP)
Hole punch (I used my Cropodile)
Cricut (If you don't have a Cricut you can use a 6" scallop punch and a circle cutter or punch)
Mini Monograms Cartridge for Cricut
Corner rounder (I looove the fiskars one)
Scissors
Paper cutter
Distress Ink in Walnut Stain
Dauber

How To Do It:
Decide which letters you would like to use from the chipboard kit
then decide which order you would like your patterned paper to be in (this part takes me the longest)

Using The Mini Monograms Cartridge, make three 6 3/4" circles from one of the patterned papers
Then cut three 6 3/4" scalloped circles from the plain cardstock

Using scissors or a paper cutter, cut your coordinating scrapbook paper into small squares and glue behind negative space of chipboard letters to create a backing for the chipboard (like I did with letters P, I, and G).
Cut larger rectangles from the plain cardstock and round the corners with a corner rounder.

When all of your pieces have been cut out, use the Distress Ink to stain the edges.

After all of the pieces have been stained, assemble them using a glue adhesive


Next use a hole punch to cut holes for the ribbon.
Use two kinds of ribbon to tie the pieces of the banner together.

Embellish as desired.
I used paper flowers, buttons, and rhinestones to embellish mine.